How to use the timer
The timer counts your working time while you work, and when you stop it, Operating saves the time as a time entry. This article explains how an administrator turns the timer on, how you can hide it for yourself, how to start and stop it from the sidebar and from Hours, and what happens to the tracked time when you stop.
Written By Mikko Karjalainen
Last updated 9 days ago
You can start the timer when you begin a piece of work and stop it when you finish. Operating then saves the time that passed as a time entry on the project and task you picked, so you don't have to type the hours yourself. The timer is off until an administrator turns it on for the organization.
Before you begin
To turn the timer on for the organization, you need permission to manage organization settings.
To use the timer, your organization must use time tracking, your user must be linked to a person, and you must be allowed to create time entries.
Turning on the timer for your organization
Go to Settings → Time tracking → Time entry options.
Under Timer, turn on Enable time tracking timer.
The setting takes effect straight away for everyone in the organization. The Timer button then appears at the top of the sidebar for each person who can track time.
If you turn the setting off again, nobody can start a new timer. A timer that is already running stays visible, though, so its owner can still stop it and save the time.
Hiding the timer for yourself
After the timer is on for the organization, each person can choose whether to see it:
Go to Settings → View options.
Under Timer, turn Show timer off or on.
Show timer is on by default, and it only changes your own view. If you hide the timer while it is running, it stays visible until you stop it.
Starting the timer
Click Timer at the top of the sidebar.
Choose the project and, if the project uses tasks, the task. Operating fills in the project and task you used last.
If you have more than one position on the project that day, choose the position. If your organization saves location information for time entries, you can also change the site here.
Click Start timer.
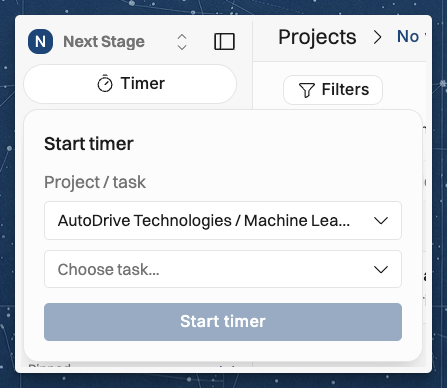
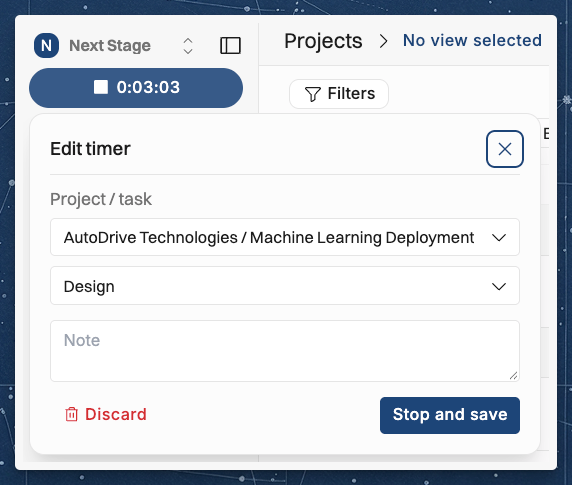
While the timer runs, the button shows the time that has passed. In Hours, the timer also shows in the top bar when the sidebar is collapsed, so you can still reach it there. You can run only one timer at a time.
Changing a running timer
Hover over the running timer to open Edit timer. Here you can change the project, task, or site, and add a note. From the same view you can click Stop and save, or click Discard to delete the timer without saving any time.
Stopping the timer
Click the running timer to stop it (the icon changes to a stop button when you hover over it). What happens next depends on what you have already tracked that day:
No matching entry yet: Operating creates a new time entry with the time that passed and shows a confirmation such as "Time entry created: 0:25:00 on Website redesign · Design".
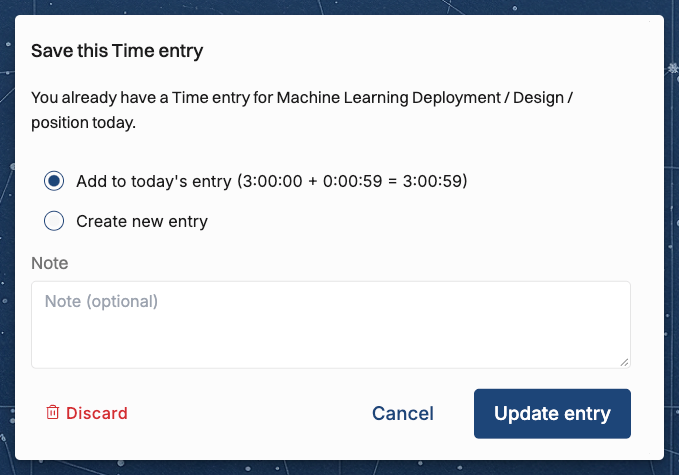
You already have an entry for the same project, task, and position that day (and the same site, if your organization saves locations): Operating asks you to choose. You can add the timer's time to that entry, which is selected by default, or create a new entry. This choice only appears for entries that are not yet submitted, approved, or invoiced.
A note is required and you have not added one: Operating asks for the note. Click Stop and save to save the note now, or Add later to save the entry without a note and add the note before you submit your time.
Both of these dialogs also have a Discard button, which deletes the timer without saving any time.
The time entry always goes on the day you started the timer, even if you stop it after midnight.
Example: adding to an entry you already have
In the morning, you tracked 1 hour 30 minutes on the Design task of a project. In the afternoon, you start the timer on the same project and task and stop it after 25 minutes. The dialog offers Add to today's entry (1:30:00 + 0:25:00 = 1:55:00). If you keep that choice and click Update entry, you end up with one entry of 1 hour 55 minutes. If you choose Create new entry, you get two entries instead, one of 1 hour 30 minutes and one of 25 minutes.
What the timer saves
A time entry from the timer is the same as one you type into the timesheet. You can see it in Hours, edit it, submit it, and invoice it in the usual way.
Rules your organization has for time entries also apply to timer entries. For example, if your organization rounds time entries up to the nearest 15 minutes, the 1 hour 55 minute entry in the example above counts as 2 hours for billing and reporting. See Rounding time entries.
Related articles
Was this helpful?
Still need help? Ask the team